Official Manual · iPhone / iPad Walkthrough
Shadowrocket Setup Guide
Import, Connect, and Verify
Complete the initial setup in five steps: add your existing details in Home, choose a request route, then verify the result with a test and real access. Allow about ten minutes for the first setup. If something fails, jump to the relevant check.
STEP 01 / IMPORT
Add Server: Add a server or import a subscription
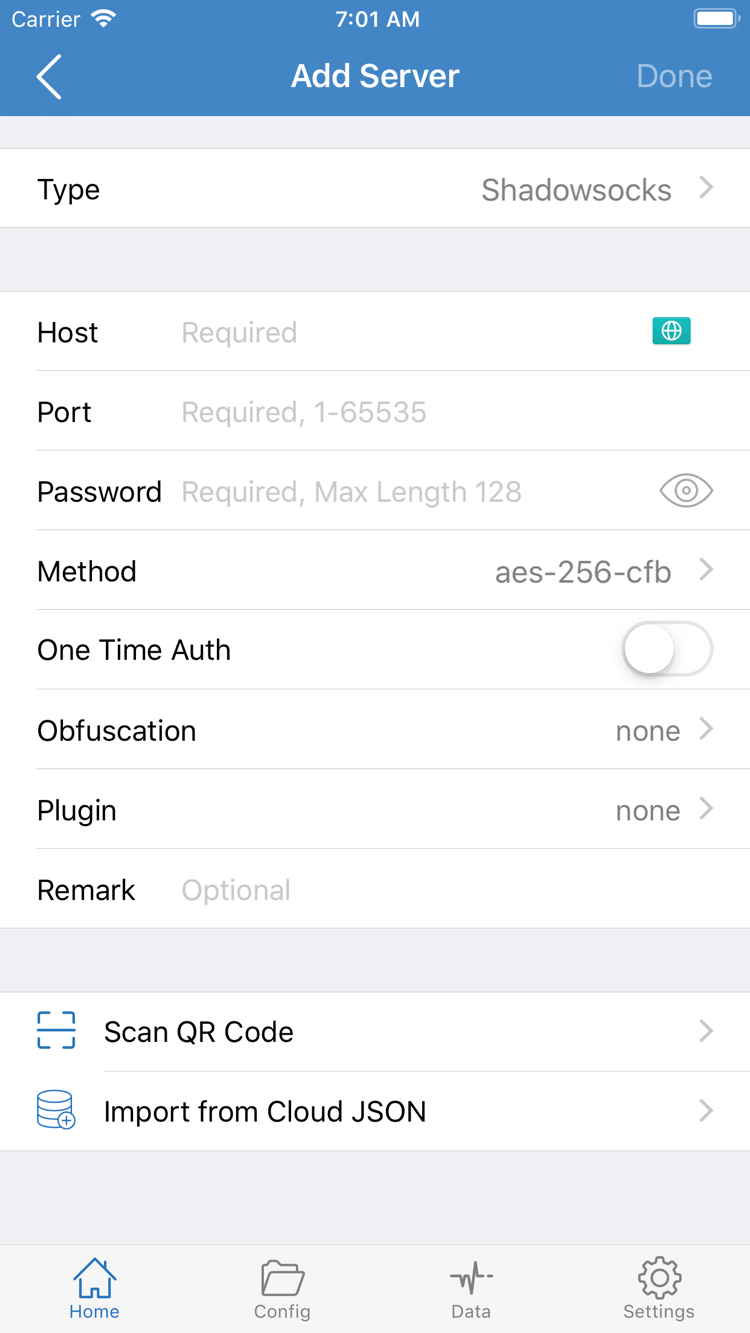
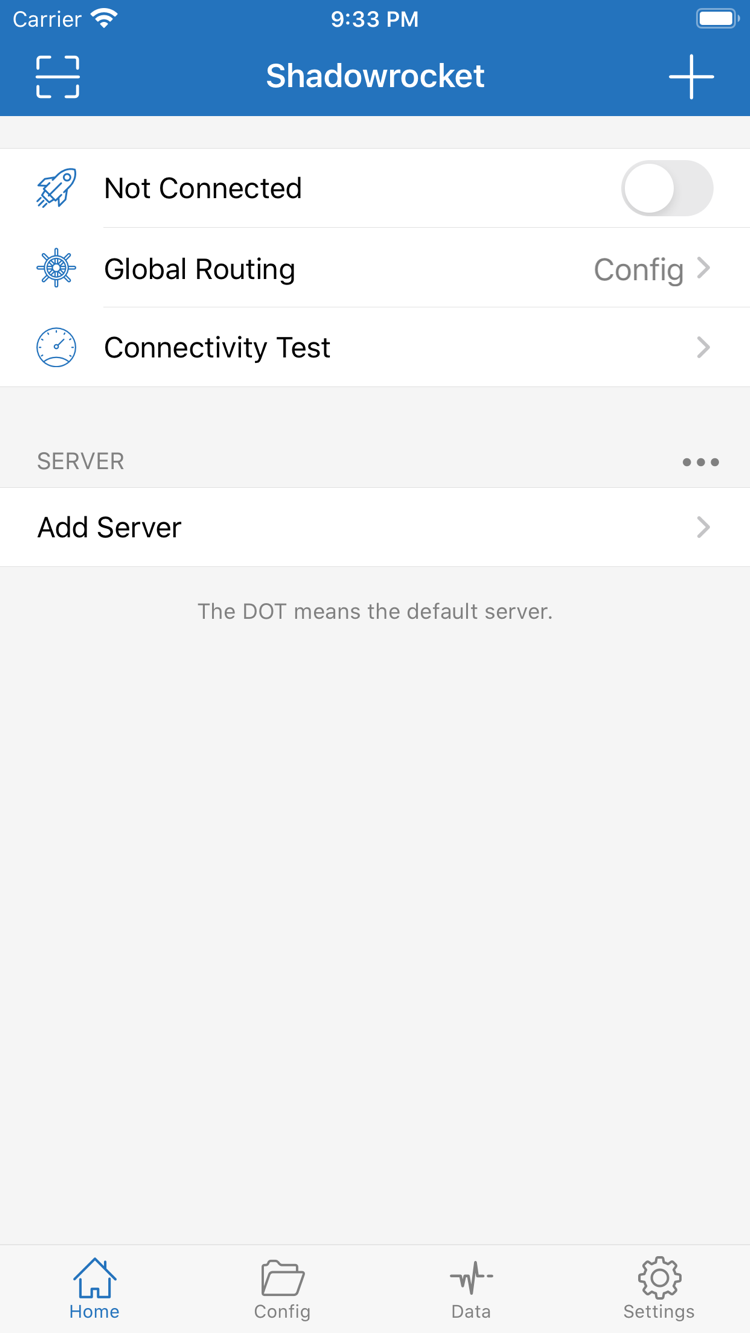
After opening Shadowrocket, go to Home and locate the SERVER section near the bottom. It lists available server entries. A name in the list means the details have been saved; it does not mean the server is currently available. Once you have your own service details, open Add Server. For the first import, use just one method. Add other details only after confirming the result, so similarly named entries do not make it hard to tell which one you are testing.
For a subscription link: choose Subscribe
- Tap the add control on Home to open Add Server, then choose Subscribe under Type. Use the complete link provided by your service provider, not its website homepage, sign-in page, or account management page.
- Paste the link into the URL field and check for spaces, line breaks, or chat text accidentally added at either end. Parameters in the link are part of the address; do not remove them to shorten what is displayed.
- Enter a recognizable note and save. Wait for the subscription to finish loading, then return to Home and check the SERVER list. If no entry appears, first check the error message rather than immediately importing repeatedly.
A subscription is a way to import server details in bulk. Later updates may change names, addresses, or the number of entries, and manual edits to subscription-generated content may be overwritten during an update. First confirm that the subscription loads correctly, then consider organizing groups. Subscription links often contain access credentials. Do not put a complete link in public screenshots, comments, or shared documents; redact authentication details when reporting an issue.
For individual server details: fill in each field for the selected Type
Open Add Server again. Type must match the service details you have. In the form shown in the screenshot, enter the server hostname or IP address in Host, the service port in Port, and the provided values in Password and Method. Do not include a full webpage path in Host. Fields change when you choose another protocol, so do not apply one protocol’s instructions to another. For TLS, transport options, or additional authentication fields, check each value against the server details rather than guessing from its name.
If you have a QR code, use Scan QR Code. Import from Cloud JSON is for the corresponding JSON details; it is not a substitute for an arbitrary subscription address. Do not keep changing Type to force an incompatible link through the import process. After saving, return to Home and select the entry you just added. Note its label; in the next step, you will choose a request route for this selected entry.
If the difference between a subscription, a server, and a configuration file is unclear, start with the glossary. This step is complete when the expected entry appears in Home and its protocol and connection parameters have a clear source.
STEP 02 / ROUTING
Global Routing: Choose Config, Proxy, or Direct
After adding a server entry, return to Home and open Global Routing. This determines how requests are handled; it does not fill in server details or make an unavailable server work. Distinguish the three modes: Config / Proxy / Direct. Before choosing, clarify your goal: are you checking whether an existing server works, or using your own rules for everyday routing?
- Config: Routes requests according to the current configuration’s rules. During the same connection, different domains may use PROXY, DIRECT, REJECT, or other policies, depending on the specific rules and their order.
- Proxy: Uses a proxy policy for the primary request path. This can reduce variables from rule-based routing while troubleshooting, but results still depend on the configuration and the scope of system traffic.
- Direct: Connects the primary request path directly to its destination. This is not suitable for proving that the selected proxy server is working. An enabled switch and a request using the proxy are two separate things to verify.
Check the current file before using Config
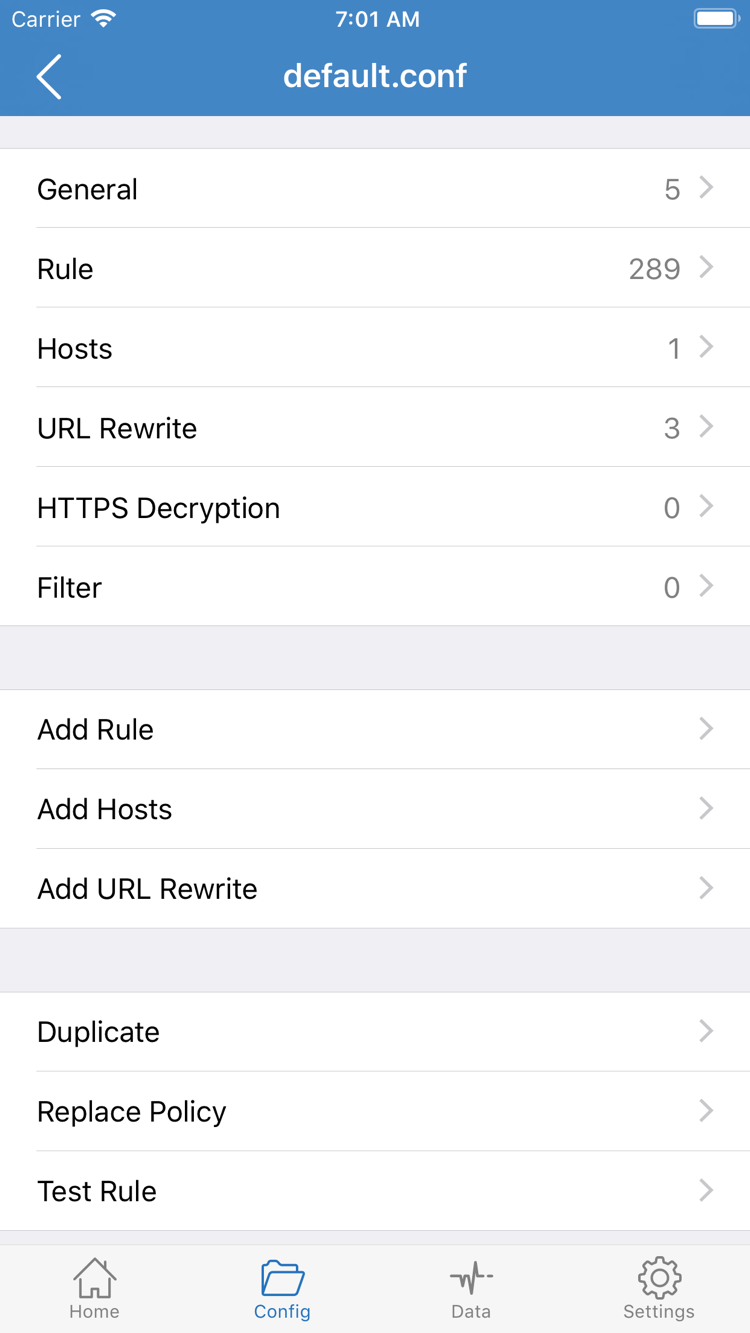
Open Config from the bottom navigation to view the active configuration file. Enter the editor only if you need to inspect its contents. In the official screenshot, General, Rule, Hosts, URL Rewrite, and HTTPS Decryption are separate configuration sections. For a first setup, focus on the active file and Rule; you do not need to edit every section. Back up the existing file first, then check for rules related to the target domain. Add Rule is for adding rules, not servers.
The snippet below illustrates rule order only. It is not a complete configuration and contains no server details. DOMAIN-SUFFIX matches the specified domain and its subdomains; FINAL catches requests that did not match earlier rules. If the final rule comes first, later rules may not be evaluated. In this example, only requests matching example.com use PROXY; everything else goes to DIRECT. This does not mean all traffic should use a proxy.
[Rule]
DOMAIN-SUFFIX,example.com,PROXY
FINAL,DIRECT
After checking the file, return to Home and confirm that Global Routing shows the mode you selected. For the first test, do not change the mode, server, and entire configuration at the same time; otherwise, even if the result changes, it will be hard to tell why. See the glossary for rule keyword definitions. For DNS, rule references, and more settings, continue to the Settings reference.
STEP 03 / CONNECT
Home: Turn on the top switch and authorize the system prompt
Return to Home. First check the selected entry under SERVER, then check Global Routing. Turn on the connection switch at the top only when both match your expectations. Not Connected in the screenshot indicates the state before connecting; it is not the state to expect after completing the steps. If you were already connected, disconnect first after changing important parameters, then reconnect so you can observe the new settings.
- Tap the switch at the top of Home. On first use, the system may ask to add a VPN configuration. Confirm that the prompt is for Shadowrocket, continue, and complete any passcode or biometric confirmation required by the device.
- After authorization, return to Shadowrocket and check whether the switch stays on and the connection status changes. If authorization was canceled, start the connection again. Do not skip system authorization and change the server password instead.
- If the switch immediately turns off again, note the message, then check system authorization, the current configuration, and the parameters. If the switch stays on but webpages do not load, continue to the next step; do not treat these as the same failure.
The system VPN indicator shows that the device has established the corresponding network configuration state. It does not by itself prove that the remote server, domain resolution, and destination service are all working. Similarly, the connection status on Home and the availability of a SERVER entry are not the same thing. Check these separately: “configuration enabled,” “server responding,” and “requests using the expected route.” This avoids ending the check just because the switch is on.
During testing, avoid enabling complex On Demand conditions or letting another VPN configuration take over the network at the same time. If the connection starts automatically again after being turned off, check On Demand conditions in Settings instead of repeatedly toggling the switch. The goal for initial setup is to complete one repeatable manual connection. Add automatic connection behavior after confirming the basic route works.
For now, keep the same server, mode, and Config as you move to the next step. This makes later test results comparable if something goes wrong.
STEP 04 / VERIFY
Connectivity Test: Test, then verify real access
Keep the connection active, tap Connectivity Test on Home, and wait for it to finish. The result can help assess connectivity under the current test method, but the test destination may differ from the service you actually want to access. Do not judge all services by a single value in the list, or treat one timeout as proof that the subscription has failed. First confirm that you are testing the entry you just selected, and check whether the network switched from Wi-Fi to cellular during the test.
Next, open a browser or target app and make a new request. Prefer a service page you know is working and actually need to check. If you only open a page that was already loaded, caching may make the result misleading. Reload the page or open content within the service that you have not visited before. Even if access works, check the current Global Routing mode: a page opening under Direct does not prove the proxy route is working.
| Observed result | Next check |
|---|---|
| Test fails and real access also fails | Check the device network, server parameters, and service status. Rule out basic connection issues first. |
| Test succeeds, but some services fail | Check the target domain’s rules, DNS, and the target service’s own status. |
| Test fails, but real access works | Check Test Method in Settings and distinguish test conditions from service requests. |
| Connection is on, but the request route is unexpected | Check Global Routing, the current Config, and the matching result for the specific rule. |
When using Config, check available logs to see which rule and policy matched the target request. One page may call several domains; the main page loading does not mean all related requests use the same route. During troubleshooting, track one specific failed request, note the target hostname, network, and current mode, then check the corresponding rule. Back up the configuration before changing a rule, and make a new request after the change instead of relying on the old connection’s result.
This step is complete when the connection stays active, the services you need respond normally, and the rule routing matches your expectations—not when a fixed test value is reached. If the test and real results conflict, record what you observed and continue to the final step. Do not reinstall the client straight away.
STEP 05 / DIAGNOSE
Settings: Check issues one stage at a time
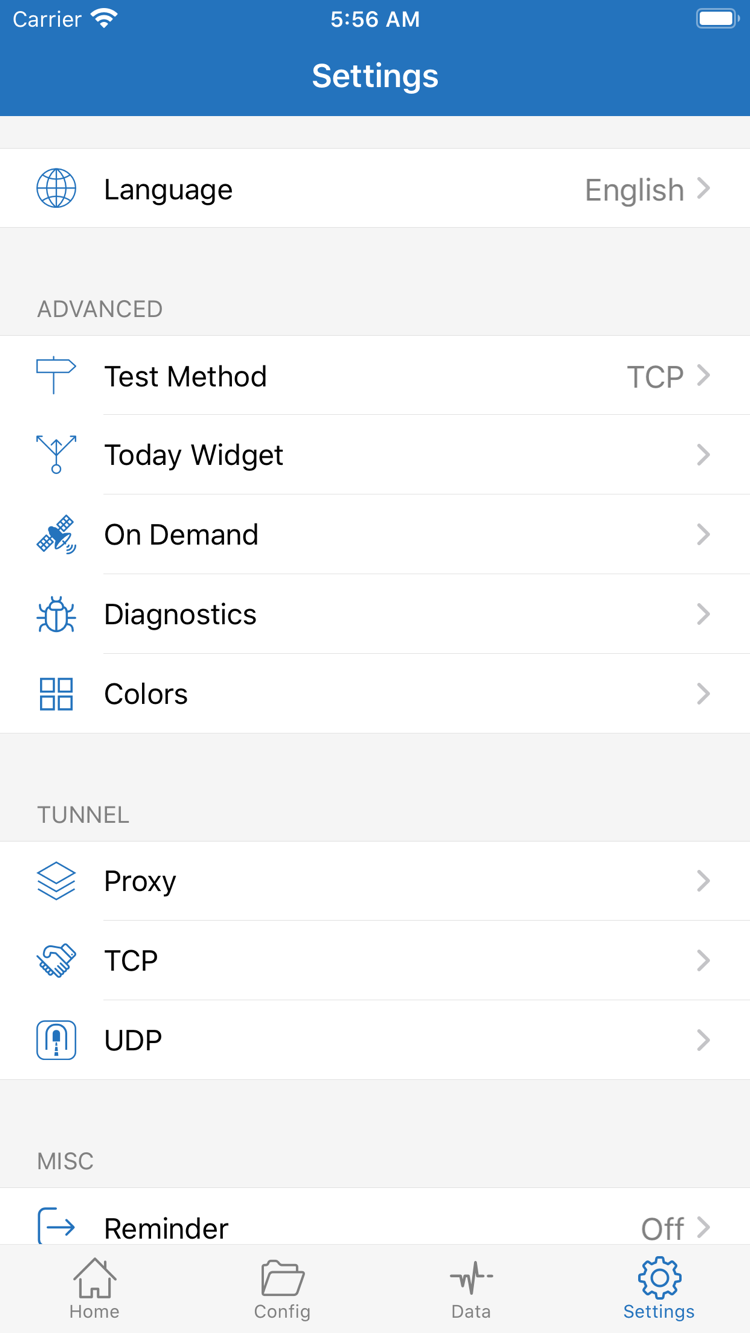
First identify whether the failure occurs during import, connection, or an actual request. Then open Settings and check the relevant items. Test Method, On Demand, Diagnostics, Proxy, TCP, and UDP in the screenshot cover different settings; do not change them all while troubleshooting. Change one item at a time, reconnect, and repeat the same test. If it does not help, restore the original value. Keeping the current Config and original service details is more useful for locating the issue than clearing settings at random.
Subscription fails to load, or the list is empty after import
Return to Add Server and check that Type is Subscribe, the link is complete, and you have not used a webpage address by mistake. Confirm that the device can access the subscription address on the current network; loading a subscription also requires a network connection, so do not assume it can update without an established proxy connection. If you see an authentication or permissions error, confirm the details with a service provider you already use. Do not repeatedly import the same link instead of checking it, and do not share the complete subscription address. If you have existing working entries, keep them for comparison.
Entry is saved, but connection or test fails
Check Host, Port, authentication fields, and Type one by one, paying particular attention to spaces introduced while copying and protocol mismatches. If the details include TLS, a transport path, or other extended parameters, they must match the server. Also confirm that the device itself has internet access, and, if possible, repeat the same test on another network. If the result changes only after switching networks, continue checking network conditions. If it fails on every network, prioritize the server details and service status rather than changing rules first.
Test results are unusual, or only some requests fail
Check Test Method in Settings and understand the method being used before comparing Connectivity Test with real access. A timeout under some test conditions does not mean every protocol is unavailable. If only specific domains are affected, check the order of rules in Config, whether REJECT is matched, and whether DNS returns a valid result. TCP and UDP differences also depend on the specific service. Avoid switching related settings at random before identifying the type of failed request.
Connection starts automatically after being turned off, or diagnostics are needed
Check whether On Demand has rules that match the current network conditions. First pause automatic triggers, then test the top switch manually. For further analysis, review the available diagnostic information in Diagnostics. Before sharing it, redact private information in server addresses, subscription authentication parameters, and other credentials. When describing the issue, include the step where it occurred, the network, current Global Routing mode, and the individual tests already performed. This is more helpful than a screenshot of the switch alone.
For specific DNS, Proxy port, or On Demand options, continue to the Settings reference. For protocol fields or rule keywords, see the glossary. Once the setup works, save a backup of the current configuration. Organize subscriptions and automatic connection conditions afterward, rather than mixing initial connectivity with advanced changes in one round of setup.